Victron Integration Guide
This guide covers how to configure the Victron Cerbo GX integration for automatic generator control.
Table of Contents
- Overview
- Hardware Setup
- Cerbo GX Configuration
- GenMaster Configuration
- Signal Behavior
- Override System
- Troubleshooting
Overview
The RPi Generator Control system integrates with Victron Cerbo GX to automatically start and stop your generator based on battery state of charge (SOC).
How It Works
- Cerbo GX monitors battery SOC via your BMS or SmartShunt
- When SOC drops below your configured threshold, Cerbo GX closes a relay
- GenMaster detects the relay signal on GPIO17
- GenMaster tells GenSlave to start the generator
- When SOC recovers, Cerbo GX opens the relay
- GenMaster stops the generator

Hardware Setup
Required Equipment
- Victron Cerbo GX (or Venus GX)
- Raspberry Pi 5 running GenMaster
- Wire to connect Cerbo relay to Pi GPIO
Wiring
Connect Cerbo GX Relay 1 or 2 to the Raspberry Pi:
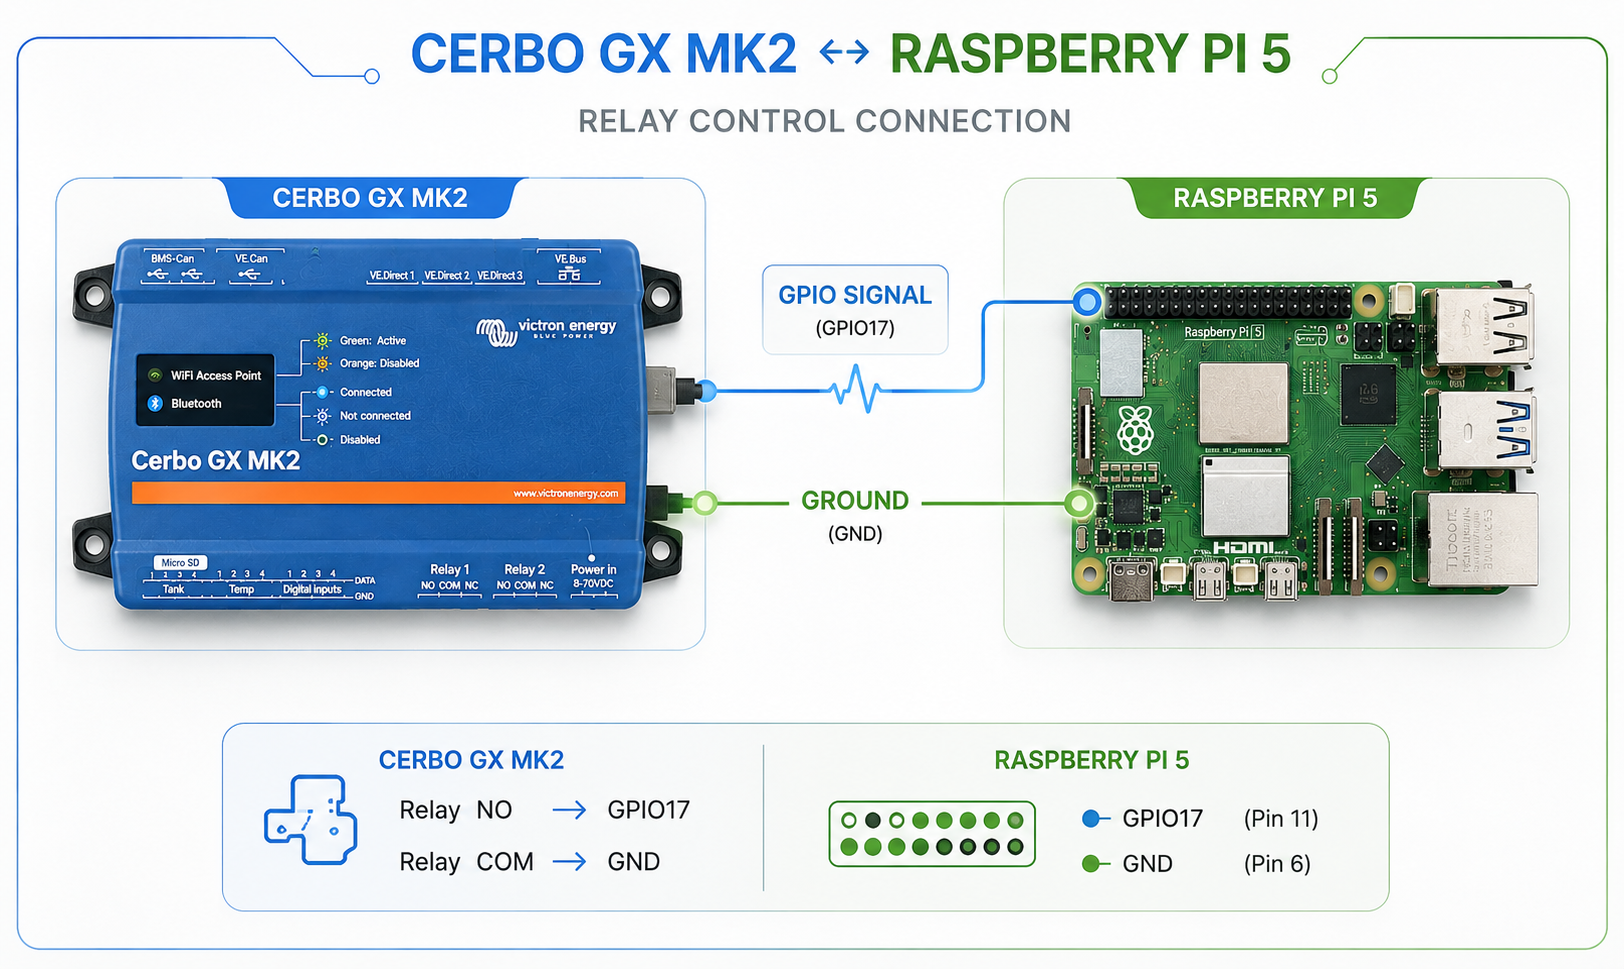
- NO = Normally Open contact
- COM = Common contact
- Use GPIO17 (physical pin 11) and any GND pin (e.g., pin 9)
Note: The signal uses a pull-up resistor internally. When the relay closes, GPIO17 goes LOW (active-low logic).
Optional: Relay Module
If your Cerbo relay output is incompatible with GPIO voltage levels, use an optocoupler or relay module:
Cerbo GX Configuration
Access VRM or Local Console
- Via VRM Portal: Log in at vrm.victronenergy.com
- Via Local Console: Connect display to Cerbo, or use the web interface at
http://cerbo-ip-address
Configure Generator Start/Stop
Navigate to Settings > Generator Start/Stop:
Generator Start/Stop Settings
| Setting | Recommended Value |
|---|---|
| Auto start enabled | On |
| On loss of communication | Stop (safety first) |
Battery SOC Conditions
| Setting | Description | Suggested Value |
|---|---|---|
| Start on SOC | SOC below which generator starts | 30-40% |
| Start after condition reached for | Delay before starting | 60 seconds |
| Stop on SOC | SOC above which generator stops | 80-90% |
| Stop after condition reached for | Delay before stopping | 60 seconds |
Relay Assignment
- Go to Settings > Relay
- Select Relay 1 or Relay 2
- Set Function to Generator
Example Configuration
Generator Start/Stop:
├── Auto start: On
├── Start on SOC: 35%
├── Start delay: 60 seconds
├── Stop on SOC: 85%
├── Stop delay: 60 seconds
└── Relay: Relay 1 = Generator
GenMaster Configuration
Environment Variables
Set in your .env file:
# GPIO pin for Victron signal (default: 17)
VICTRON_GPIO_PIN=17

# Mock GPIO for development (set true on non-Pi systems)
MOCK_GPIO=false
Docker Configuration
GenMaster requires GPIO access. In docker-compose.yaml:
genmaster:
  # Required for GPIO access on Pi 5
  privileged: true
  user: root

  # Alternative: device mappings
  devices:
    - /dev/gpiochip0:/dev/gpiochip0
    - /dev/gpiomem4:/dev/gpiomem4  # Pi 5 specific
Verifying Signal Detection
Check GPIO monitor status:
# View logs
docker compose logs genmaster | grep -i gpio

# Check current state via API
curl https://your-genmaster/api/health \
  -H "Authorization: Bearer YOUR_TOKEN"
The victron_signal field shows current state (active/inactive).
Signal Behavior
State Transitions
| Victron Signal | Generator State | Action |
|---|---|---|
| Goes ACTIVE | Stopped | Start generator (if armed and no override) |
| Goes INACTIVE | Running (victron trigger) | Stop generator |
| Goes INACTIVE | Running (manual trigger) | No action (manual run continues) |
| Any | N/A | Override active - ignored |
Important Notes
- Arming required: The relay must be armed for automatic starts
- Override priority: Force-stop override blocks automatic starts
- Trigger tracking: System remembers what triggered each run
- Manual runs continue: A Victron stop signal won't stop a manually-started run
Debouncing
The GPIO monitor includes 100ms debounce to prevent false triggers from electrical noise.
Override System
Overrides let you control the generator regardless of Victron signals.
Override Types
| Type | Effect | Use Case |
|---|---|---|
| force_run | Generator runs, ignores Victron "stop" signal | Keep generator running for maintenance/testing |
| force_stop | Blocks automatic starts from Victron | Prevent generator during maintenance window |
Using Overrides
Via Web UI:
- Navigate to Generator dashboard
- Find the Victron Override section
- Toggle override ON
- Select type (Force Run or Force Stop)
Via API:
# Enable force_run override
curl -X POST https://your-genmaster/api/override/enable \
  -H "Authorization: Bearer YOUR_TOKEN" \
  -H "Content-Type: application/json" \
  -d '{"override_type": "force_run"}'

# Enable force_stop override
curl -X POST https://your-genmaster/api/override/enable \
  -H "Authorization: Bearer YOUR_TOKEN" \
  -H "Content-Type: application/json" \
  -d '{"override_type": "force_stop"}'

# Disable override (return to automatic)
curl -X POST https://your-genmaster/api/override/disable \
  -H "Authorization: Bearer YOUR_TOKEN"

# Check current status
curl https://your-genmaster/api/override/status \
  -H "Authorization: Bearer YOUR_TOKEN"
Override Behavior Details
force_run: - Generator starts immediately (if not running) - Victron "stop" signal is ignored - Generator continues until override is disabled - Useful for testing or extended charging
force_stop: - Generator stops immediately (if running) - Victron "start" signal is ignored - Manual and scheduled starts still work - Useful during maintenance windows
API Reference
Victron Status
GET /api/health
Returns system health including Victron signal state:
{
  "status": "healthy",
  "victron_signal": "inactive",
  "generator_running": false,
  "slave_connected": true
}
Override Endpoints
| Method | Endpoint | Description |
|---|---|---|
| GET | /api/override/status |
Get current override status |
| POST | /api/override/enable |
Enable override |
| POST | /api/override/disable |
Disable override |
Mock Signal (Development)
For testing on non-Pi systems:
# Set mock signal to active
curl -X POST https://your-genmaster/api/dev/victron/active \
  -H "Authorization: Bearer YOUR_TOKEN"

# Set mock signal to inactive
curl -X POST https://your-genmaster/api/dev/victron/inactive \
  -H "Authorization: Bearer YOUR_TOKEN"

# Toggle mock signal
curl -X POST https://your-genmaster/api/dev/victron/toggle \
  -H "Authorization: Bearer YOUR_TOKEN"
Timing Considerations
Startup Delay
When Victron signal activates: 1. GenMaster detects signal change (~100ms debounce) 2. State machine processes request 3. Heartbeat syncs to GenSlave (up to 10s) 4. GenSlave activates relay 5. Generator cranks and starts
Total delay: 1-15 seconds typical
Shutdown Delay
When Victron signal deactivates: 1. GenMaster detects signal change 2. Generator stop command sent 3. Generator runs down
Total delay: 1-5 seconds typical
Cerbo Delays
Add Cerbo's configured delays: - Start delay: Prevents starting on brief SOC dips - Stop delay: Ensures battery is sufficiently charged
Recommended: 60 seconds each for stable operation
Troubleshooting
Generator Not Starting on Low SOC
-
Check Victron signal:
-
Check if armed:
- Generator must be armed to auto-start
-
Look for "not armed" in logs
-
Check override:
- Force-stop override blocks auto-starts
-
Check
/api/override/status -
Check Cerbo configuration:
- Verify relay is assigned to Generator function
- Verify SOC thresholds are correct
-
Check relay is closing (LED indicator)
-
Check GPIO:
Generator Won't Stop After Charging
- Check trigger type:
- Only victron-triggered runs stop on signal
-
Manual runs continue regardless
-
Check override:
- Force-run override keeps generator running
-
Disable override to allow stop
-
Check Cerbo:
- Verify stop SOC threshold
- Verify relay is opening
Signal Stuck Active/Inactive
- Check wiring:
- Verify connections to GPIO17 and GND
-
Check for loose connections
-
Check relay:
- Listen for relay click on Cerbo
-
Check relay LED indicator
-
Test with multimeter:
- Measure voltage between relay contacts
- Closed = near 0V, Open = floating
Mock Mode Warnings
If you see "Mock GPIO mode" in logs: - On development machine: Expected behavior - On Raspberry Pi: Check GPIO access permissions and device mappings
Best Practices
1. Set Appropriate Thresholds
- Don't set start SOC too high (frequent short runs)
- Don't set stop SOC too low (generator runs too long)
- Leave 40-50% gap between start and stop SOC
2. Use Delays
Configure Cerbo delays to prevent: - Starting on brief SOC fluctuations - Stopping before battery is adequately charged
3. Monitor Battery Health
The generator protects your battery, but monitor: - Cycle count - Battery temperature - Charge/discharge rates
4. Test Periodically
- Manually trigger low-SOC condition
- Verify generator starts
- Verify generator stops at target SOC
- Check all notifications were sent
Next Steps
- Generator Controls - Manual control options
- Scheduling Guide - Scheduled runs alongside Victron
- Notifications - Get alerts for Victron events
- Troubleshooting - More debugging tips