Tailscale Setup Guide
This guide covers how to configure Tailscale VPN for secure communication between GenMaster and GenSlave.
Table of Contents
- Overview
- Why Tailscale
- Prerequisites
- GenMaster Setup
- GenSlave Setup
- Configuring Communication
- Access Control
- Troubleshooting
Overview
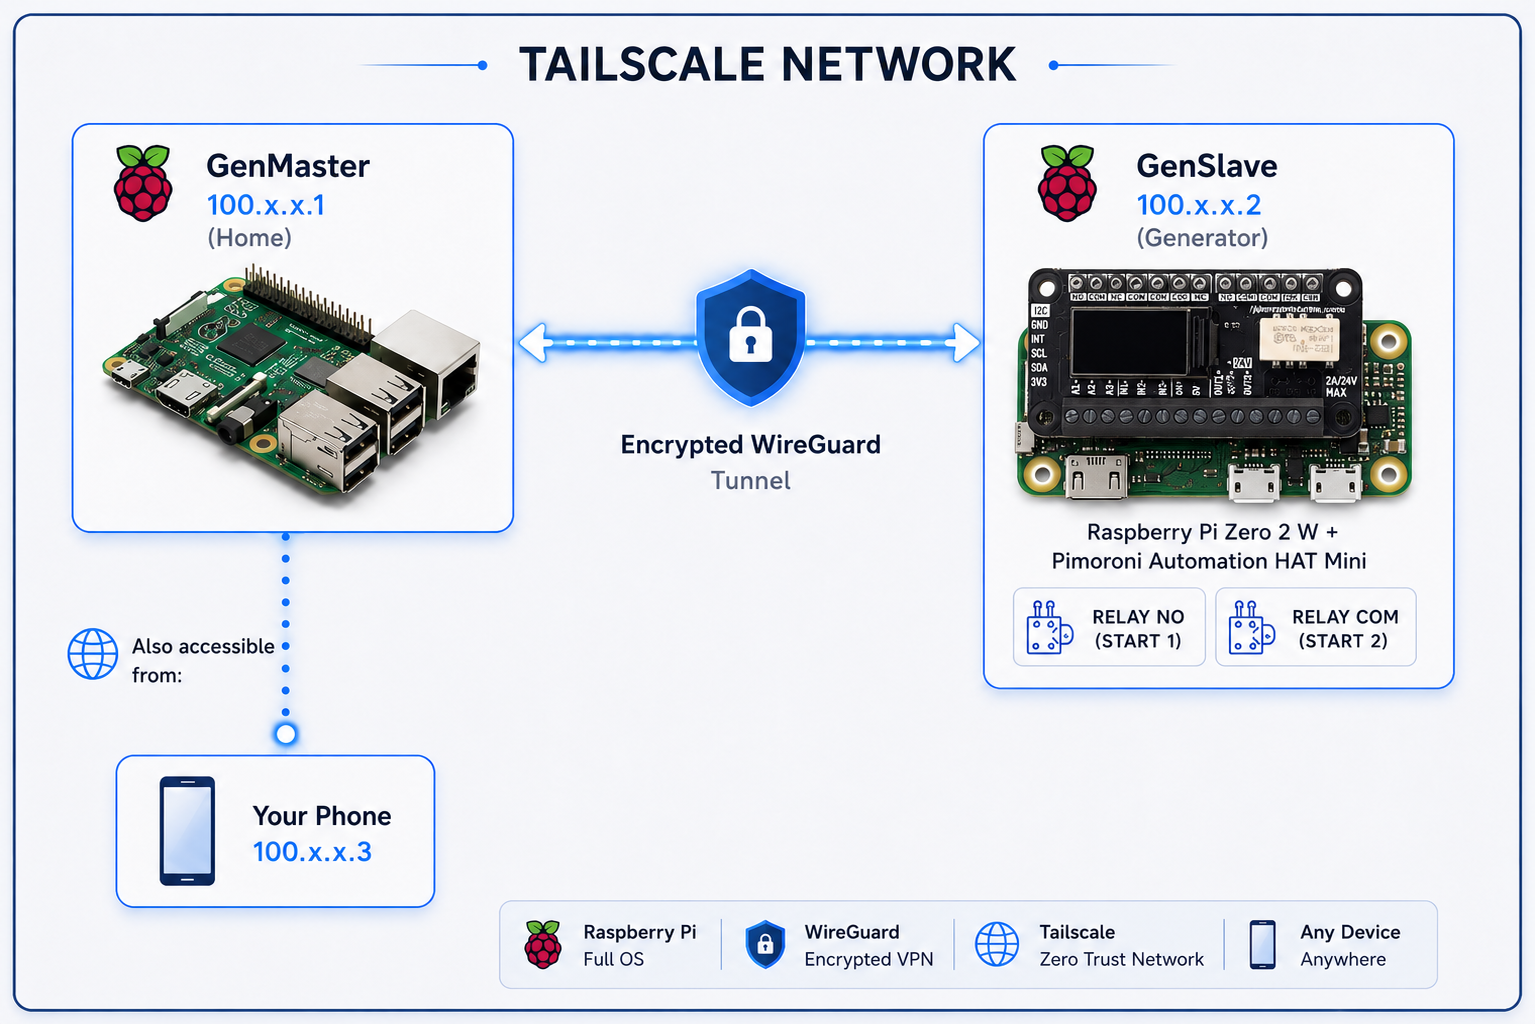
Tailscale creates a secure mesh VPN network between your devices, allowing GenMaster and GenSlave to communicate securely regardless of their physical network location.
Architecture
Why Tailscale
| Feature | Benefit |
|---|---|
| WireGuard-based | Fast, modern encryption |
| No port forwarding | Works through NAT/firewalls |
| Mesh networking | Direct device-to-device connections |
| Zero configuration | No complex VPN setup |
| MagicDNS | Access devices by hostname |
| Free tier | 100 devices, 3 users |
Use Cases
- GenSlave at remote location - Generator shed with different network
- Mobile access - Monitor from phone anywhere
- Multi-site - Multiple generators across locations
- Secure by default - All traffic encrypted
Prerequisites
- Tailscale account - Sign up at tailscale.com
- Docker on GenMaster
- Tailscale client on GenSlave (can be Docker or native)
GenMaster Setup
Option 1: Docker (Recommended)
Add Tailscale to your GenMaster docker-compose:
tailscale:
  image: tailscale/tailscale:latest
  container_name: genmaster_tailscale
  hostname: genmaster
  restart: unless-stopped
  environment:
    - TS_AUTHKEY=${TAILSCALE_AUTHKEY}
    - TS_STATE_DIR=/var/lib/tailscale
    - TS_USERSPACE=false
  volumes:
    - tailscale_state:/var/lib/tailscale
    - /dev/net/tun:/dev/net/tun
  cap_add:
    - NET_ADMIN
    - NET_RAW
  network_mode: host
  profiles:
    - tailscale
Get an Auth Key
- Go to login.tailscale.com/admin/settings/keys
- Click Generate auth key
- Options:
- Reusable: Yes (for multiple devices)
- Ephemeral: No (devices persist)
- Pre-approved: Yes (no manual approval needed)
- Copy the key (starts with
tskey-auth-...)
Configure Environment
Add to .env:
Start Tailscale
# Start with tailscale profile
docker compose --profile tailscale up -d

# Check status
docker compose exec tailscale tailscale status

# Get IP address
docker compose exec tailscale tailscale ip
Option 2: Native Installation
If not using Docker:
# Install Tailscale
curl -fsSL https://tailscale.com/install.sh | sh

# Start and authenticate
sudo tailscale up

# Check status
tailscale status
GenSlave Setup
Option 1: Native on Pi Zero (Recommended)
Native installation is lighter for the Pi Zero's limited resources:
# Install Tailscale
curl -fsSL https://tailscale.com/install.sh | sh

# Authenticate
sudo tailscale up --authkey=tskey-auth-xxxxx

# Verify
tailscale status
tailscale ip
Option 2: Docker Sidecar
If you prefer Docker:
# In genslave docker-compose.yaml
tailscale:
  image: tailscale/tailscale:latest
  container_name: genslave_tailscale
  hostname: genslave
  restart: unless-stopped
  environment:
    - TS_AUTHKEY=${TAILSCALE_AUTHKEY}
    - TS_STATE_DIR=/var/lib/tailscale
    - TS_USERSPACE=false
  volumes:
    - /var/lib/tailscale:/var/lib/tailscale
    - /dev/net/tun:/dev/net/tun
  cap_add:
    - NET_ADMIN
    - NET_RAW
  network_mode: host
Verify Connection
Configuring Communication
GenMaster Configuration
Update .env with GenSlave's Tailscale address:
# Use Tailscale hostname (MagicDNS)
GENSLAVE_HOST=genslave

# Or use Tailscale IP directly
GENSLAVE_HOST=100.x.x.x

# Port remains the same
GENSLAVE_PORT=8001

# API secret (must match GenSlave)
GENSLAVE_API_SECRET=your-shared-secret
Testing Connection
# From GenMaster, test GenSlave API
curl http://genslave:8001/api/health \
  -H "X-API-Key: your-shared-secret"

# Should return health status
DNS Resolution
With MagicDNS enabled (default), you can use hostnames:
- genmaster → GenMaster's Tailscale IP
- genslave → GenSlave's Tailscale IP
To verify MagicDNS:
Access Control
Tailscale ACLs
Control which devices can communicate via ACL policies:
{
  "acls": [
    {
      "action": "accept",
      "src": ["tag:genmaster"],
      "dst": ["tag:genslave:8001"]
    },
    {
      "action": "accept",
      "src": ["tag:admin"],
      "dst": ["*:*"]
    }
  ],
  "tagOwners": {
    "tag:genmaster": ["autogroup:admin"],
    "tag:genslave": ["autogroup:admin"],
    "tag:admin": ["autogroup:admin"]
  }
}
Applying Tags
# On GenMaster
sudo tailscale up --advertise-tags=tag:genmaster

# On GenSlave
sudo tailscale up --advertise-tags=tag:genslave
Exit Nodes
If you want to route all traffic through a specific device:
# Advertise as exit node (on a server)
sudo tailscale up --advertise-exit-node

# Use exit node (on client)
sudo tailscale up --exit-node=genmaster
Subnet Routing
To access devices on GenSlave's local network:
Enable on GenSlave
Approve in Admin Console
- Go to Tailscale Admin
- Find GenSlave
- Click ... → Edit route settings
- Enable the advertised subnet
Troubleshooting
Devices Not Connecting
-
Check authentication:
Should show both devices. -
Check key validity:
- Auth keys expire after set time
-
Generate new key if needed
-
Check firewall:
High Latency
-
Check relay usage:
Direct connections are faster than relayed. -
Check DERP region: Use closest region for best performance.
DNS Not Working
- Verify MagicDNS enabled:
- Check in Admin Console
-
DNS settings should show Tailscale nameserver
-
Restart Tailscale:
-
Check resolv.conf:
Connection Drops
- Check for IP conflicts:
-
Ensure Tailscale IPs don't conflict with local network
-
Check keepalive:
-
Check logs:
Security Best Practices
1. Use Auth Key Expiration
Set auth keys to expire: - Single-use keys for one-time setup - Time-limited keys for automated deploys
2. Enable Key Expiry
In Admin Console, enable key expiry so devices need to re-authenticate periodically.
3. Use ACLs
Restrict which devices can communicate: - GenMaster ↔ GenSlave only - Admin devices have full access
4. Monitor Access
Check the Machines page regularly for: - Unknown devices - Unused devices - Last seen timestamps
5. Disable Unused Features
If not needed: - Disable subnet routing - Disable exit nodes - Restrict MagicDNS to your devices
Comparison with Cloudflare Tunnel
| Feature | Tailscale | Cloudflare Tunnel |
|---|---|---|
| Best for | Device-to-device | Public web access |
| Protocol | WireGuard VPN | HTTPS proxy |
| Latency | Lower (direct) | Higher (via Cloudflare) |
| Setup | Per-device client | Single container |
| Authentication | Tailscale SSO | Cloudflare Access |
| Use case | GenMaster ↔ GenSlave | Remote web UI |
Recommendation: Use both! - Tailscale for GenMaster ↔ GenSlave communication - Cloudflare Tunnel for public web access
Next Steps
- Cloudflare Setup - Public web access
- GenSlave Setup - Configure GenSlave networking
- Network Configuration - WiFi profiles, static IPs, when to choose Tailscale vs local IPs for the GenMaster↔GenSlave link
- Troubleshooting - Common issues